")
So, you’ve decided to give aeromodelling a go? This page will give you a little more of an insight into the hobby before you part with your hard earned cash.
Have a read through all of the information and come down to the club for a chat to see the sort of aircraft you should purchase.
Where to Start
Flying model aircraft can be a thrilling and rewarding hobby. It is an open-ended hobby in which you will continually be learning new things and developing new skills (building, flying, design, aerobatics) almost without limit.
- Before you spend your money, come to the club and chat to some of our members to see what sort of model you should be thinking of. Many new pilots come to the field with unsuitable models that are either too difficult to fly or use inappropriate radio gear and have to go home disappointed.
- Learning to fly is not as easy as it looks. Be prepared to put time and effort into learning the basics.
- Join the flying club! Joining a club will get you access to instructors, friendly advice, field facilities and most importantly insurance against 3rd party claims.
Building Your First Plane
When you start to assemble your first model bring it down to the field frequently so that an experienced builder can check it over. Some errors are very hard to correct once the model is finished.
A cost effective way to start is to purchase an electric trainer style of aircraft. Usually these planes are made of a tough foam and look like a high wing Cessna.
The choice of radio control equipment is important in that two radios are required for training and they need to be of the same brand.
The MASTER radio belongs to the plane and is held by the instructor. The SLAVE radio is held by the student, and both radios are buddied together either by a plugin cable (Futaba, HiTec) or wirelessly with Bluetooth (Spectrum).
It’s a good idea to talk to the club instructors and see what systems they use before purchasing any radio equipment.
The initial gear required to get flying is:
- A High-Wing trainer aircraft
- 4 Channel radio system on the 2.4Ghz band
- A motor, whether electric or glow engine
- Fuel or batteries, fuel pump, battery charger and fuel tubing (talk to us about mixing your own fuel)
- Battery & Clip to heat the glow plug (if using a glow engine)
The average cost for a new setup is around $750. If you are considering buying second hand gear please talk to us first to make sure you aren’t wasting your money.
Flying Instruction
The club has a number of people who are authorised to instruct new pilots.
Instructors are mostly available on Saturdays and Sundays and it is a good idea to book an instructor well in advance of the flying day.
Bad weather/windy conditions are NOT always suitable for learning to fly and the flying lesson may well be called off even though there are other pilots flying.
The intent of the flying lessons is to provide the basis for a new pilot to achieve “SOLO” status, meaning that they are proficient enough to fly their plane without the need of an instructor.
Once the pilot is authorised to fly “SOLO”, he can start practising for the Bronze or Silver wings status.
The training stages are shown below.
1. BUDDY BOX mode. This is when two transmitters are linked together allowing the Instructor to pass control to the student. The instructor is able to take back full control at any time to avoid mishaps.
2. SUPERVISION mode. This is when the student has full control using the Master radio and is supervised by an authorised instructor standing close by.
3. SOLO mode. This is when the instructor has deemed the student competent enough to fly his plane without the need of supervision. The new pilot may only fly planes of the same type that he has been trained on.
4. From here on the pilot can train for the Bronze or Silver wings status.
Definitions
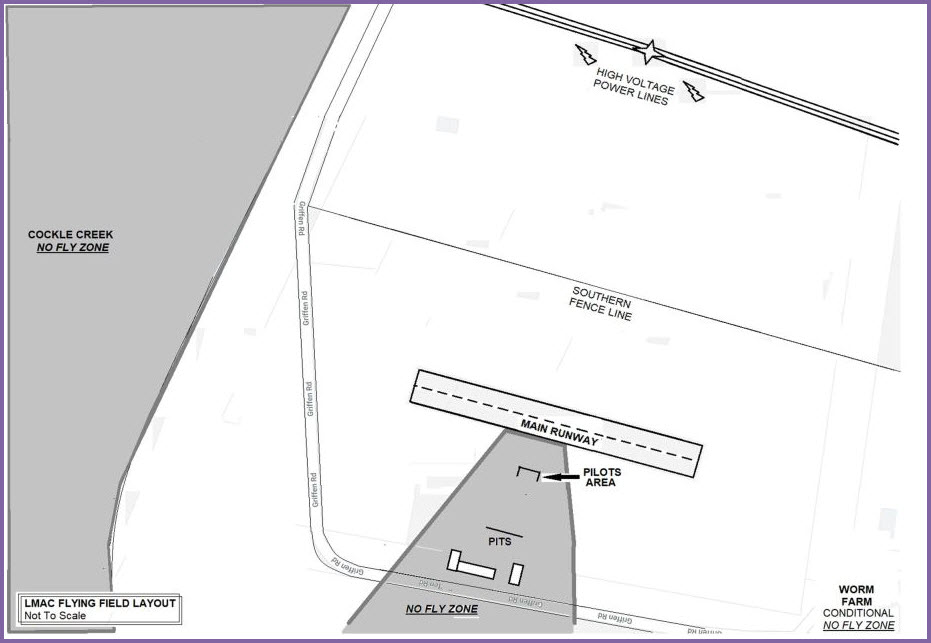
RUNWAYS. The MAIN RUNWAY runs East to West but there are two other runways that are used when there is a cross wind.
PUBLIC AREA. This is the cement floored area with the fixed table and bench seats. This area is reserved for members and visitors to sit, rest, eat, drink and chat. ELECTRIC planes are not to be armed in this area.
The PITS. Generally this is where planes are assembled, prepared and maintained prior to and after flight.
The PILOTS’ AREA. Often called the pilots’ box, this area is where the pilots stand whilst flying their planes.
The FLIGHT LINE. This is an area to the south of the pilots box and is where most of the flying is performed.
NO FLY ZONES. These areas are highlighted on the attached LMMAC FLYING FIELD LAYOUT and means just that. It is important to avoid these areas as you could be flying over people who are not involved with flying activities. We don’t want complaints coming from the public.
TAXI WAYS. These are mown paths for aircraft to be driven (taxi) under their own power to and from the MAIN AIRSTRIP.
HIGH VOLTAGE POWER LINES. Located at the far south of the field. These are closer than you think and have caught many a pilot by surprise. Some planes have hung there for weeks before dislodging.
RANGE CHECK. An inbuilt checking system that can alert to a weak or faulty radio link. Perform this on your radio set before the first flight of the day. If any abnormalities are noticed then the aircraft should not be flown until the problem has been rectified. If in doubt contact a senior pilot.
PRE-FLIGHT CHECK. This is a series of checks that are performed on the plane and the radio control system to minimise the chances of things going wrong. LMMAC Pre-Flight check list is attached here.
THROTTLE CUT SWITCH. This is a transmitter switch which has been programmed to close the throttle on a piston engine so that the engine stops. For an ELECTRIC plane the throttle cut switch when activated disables the throttle lever. This control is handy when connecting the battery (ARMING the plane) and carrying the plane to and from the pits. People have been sliced up from spinning propellers when accidentally bumping the throttle stick.
ARMING / DISARMING an electric plane. Arming is when the battery is connected in a plane, this must be performed with the transmitter switched ON. Disarming is when the battery is disconnected from a plane, the transmitter must be ON during this process.
AIRCRAFT RESTRAINTS. Pilots must restrain aircraft during starting procedures. This restraint could be, a set of pegs driven into the ground, a safety stand / table or a second person holding the plane on the ground. The purpose is to prevent the aircraft from leaping forward and harming the pilot or others.
COMMUNICATION. When in the flight box you will need to call out your intentions to the other pilots, such as “taking off, “landing” from the left or right, “going on the field” to pick up a plane, etc.
BRONZE, SILVER and GOLD WINGS. The BRONZE wings category is aimed at attracting modellers who fly models under 2kg. It’s a great step towards progress up the scale to bigger and more powerful models. SILVER wings will be applicable to members flying models weighing over 2kg. Silver Wings will allow more flyers to demonstrate their proficiency when visiting other MAAA clubs and participating in MAAA events. GOLD wings are awarded for pilots who can complete more difficult manoeuvres including the Cuban eight and inside loops and horizontal rolls.
CLUB RULES. See here.
Details of club membership fees and an application form can be found on the About The Club page.
Flying Field Layout